
Industry News
Edge Bander Maintenance in five steps: how to completely eliminate glue pot clogging
Eliminating defect traps like intermittent glue squeeze-out and micro-voids in production lines requires a complete rethink of your workshop protocols. For manufacturing technicians managing modern high-speed carpentry lines, microscopic char layers and residual chemical crusts inevitably ruin panel quality and drive up maintenance costs if left ignored. Relying on emergency reactive cleaning or harsh metal scrapers usually introduces unpredictable surface variables, degrades heating elements, and causes extensive equipment damage. Implementing tactical edge bander maintenance bypasses these chaotic repair phases entirely, serving as a reliable framework that preserves machine longevity and maintains flawless bond lines. By reading this technical document, shop floor managers and maintenance engineers will gain an actionable, 5-step blueprint to permanently eliminate adhesive carbonization, calibrate critical processing units, and significantly minimize operational overhead on automatic edge banding lines.
Table of Contents
The Hidden Costs of Poor Edge Bander Maintenance Schedules
Many wood manufacturing facilities treat machine upkeep as an afterthought, running equipment until a catastrophic component failure halts the entire shop floor. In high-volume panel processing, a reactive approach to maintenance completely destroys your operational profit margins. When adhesive residues bake onto critical mechanical surfaces, the resulting friction causes severe servo motor strain, rapid blade degradation, and uneven temperature distribution across the application rollers.
According to a comprehensive technical analysis on industrial asset utilization published by the Society for Maintenance & Reliability Professionals (SMRP), unplanned asset downtime can cost up to ten times more than a structured, predictive maintenance routine due to emergency logistics, wasted raw materials, and idle labor. For automated edge banders, a mere two hours of unexpected line stoppage can wipe out the profitability of an entire custom cabinet production run. Shifting to a strict, data-driven edge bander maintenance regimen is the single most effective way to protect your heavy machinery investments and maintain tight production schedules.
How to Clean Glue Pots on Automatic Edge Banding Machines to Prevent Carbonization
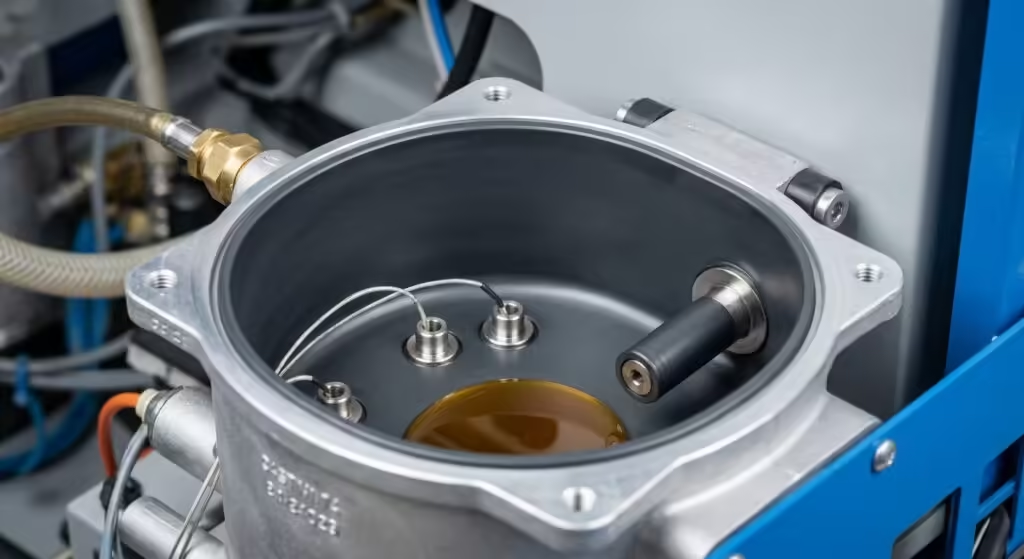
Adhesive carbonization—commonly referred to on the shop floor as “glue char”—is the leading cause of system blockages, fluid starvation, and erratic application patterns. When ethylene-vinyl acetate (EVA) or polyurethane (PUR) adhesives are subjected to prolonged heating cycles during idle periods, their polymer chains degrade, forming a dense, rock-hard carbon crust inside the reservoir. This crust acts as a thermal insulator, forcing the internal heating elements to work harder, which further accelerates local hot spots and adhesive burning.
To break this destructive cycle and restore absolute thermal efficiency, maintenance technicians must implement a standardized, non-destructive cleaning workflow:
1.Thermal Purging: Raise the reservoir temperature to the adhesive’s exact fluid threshold (typically around 160°C for EVA) and completely drain the molten, uncontaminated batch using the machine’s bottom discharge valve.
2.Chemical Breakdown: Introduce a specialized organic purging agent or high-viscosity wax cleaner into the empty pot. Allow the compound to circulate at a reduced thermal setting for 15 to 20 minutes to soften the stubborn carbonized layers bound to the aluminum walls.
3.Non-Abrasive Scraping: Utilizing a brass or heavy-duty Teflon scraper, gently dislodge the loosened carbon deposits from the reservoir surfaces. Avoid steel putty knives or wire wheels, as they scratch anti-adhesion coatings, creating micro-grooves where future char will anchor.
4.Orifice and Sensor Clearing: Clear the fluid ports and clean the infrared temperature sensor lenses using a lint-free industrial swab saturated with an approved residue solvent.
Machine Longevity Tips: Optimizing Pre-Milling and High-Speed Trimming Stations
While the adhesive delivery system requires constant vigilance, overall asset durability relies heavily on the synchronization of your pre-milling and trimming assemblies. Neglecting these mechanical stations introduces structural vibrations that directly translate into visible panel defects, telegraphing joint lines, and premature motor failure. Residual wood dust combined with airborne chemical vapors creates a highly abrasive paste that accelerates bearing wear and misaligns micro-adjustable tracking rollers.
To maximize your equipment’s service life, engineers must incorporate these fundamental machine longevity tips into their weekly operational schedules:
- Blade Geometry and Wear Assessment: Inspect the diamond or tungsten carbide pre-milling cutters for micro-chipping. Dull blades exert excessive axial force on the panel edges, causing microscopic fracturing that prevents a flush fit with the edge banding strip.
- Pneumatic Pressure Harmonization: Ensure the pressure roller manifold maintains consistent pneumatic force across the entire panel length. Uneven tracking pressures cause variable glue line thicknesses, leading to localized squeeze-out and rapid adhesive buildup on the surrounding trimmers.
- High-Velocity Dust Extraction: Maintain an absolute minimum dust extraction airspeed of 28 meters per second at the hoods. Effective chip removal prevents sticky wood particulates from settling on the high-speed linear guide rails and precision pneumatic cylinders.
For detailed engineering benchmarks regarding industrial cutting tool lifecycles and spindle alignment techniques, refer to the Wood Component Manufacturers Association (WCMA) Technical Guides, which outline standard deviation thresholds for high-volume automated profiling equipment.
Industrial Edge Bander Performance Optimization via the DW3600 Architecture
Generic woodworking machinery often demands grueling, manual cleanup processes that drain valuable shop hours. The DW3600 High-Speed Fully Automatic Edge Banding Machine fundamentally shifts this paradigm by integrating intelligent, defensive engineering directly into its physical architecture. Designed specifically to minimize human error and automate preventative care, the DW3600 incorporates an advanced, dual-stage adhesive management system that drastically reduces the frequency of manual interventions.
The DW3600’s primary glue pot features a proprietary, multi-layered Teflon non-stick coating that prevents degraded polymers from anchoring to the metallic interior. Furthermore, its intelligent closed-loop control system automatically drops the reservoir temperature to a safe “sleep mode” if the machine detects an upstream production pause exceeding 8 minutes. This single feature eliminates the root cause of carbonization, preserving adhesive chemical integrity and extending your overall edge bander maintenance intervals by up to 40%.
Additionally, the machine’s pre-milling and fine-trimming stations are completely isolated within heavily shielded, aerodynamic extraction enclosures, ensuring that micro-dust never migrates onto the high-precision linear guide mechanisms.
Implementing a Preventive Maintenance Schedule for Woodworking Machinery
Consistency on the shop floor is achieved only when complex processes are transformed into clear, unyielding protocols. To ensure your production line maintains peak efficiency across multiple shifts, shop supervisors must enforce a mandatory, tiered preventive maintenance schedule for woodworking machinery. This framework removes all ambiguity, ensuring that every operator contributes to the asset’s structural preservation.
1.The Operational Shift Checklist (Every 8 Hours)
- Clean all tracking and rubber pressure rollers using a lint-free cloth and an approved solvent-free cleaner to prevent panel marking.
- Verify that the oil mist lubricator reservoir is filled with the correct ISO VG 32 pneumatic oil.
- Clear any accumulated wood chips or edge trimming scrap from the buffer wheels and end-cutting saws.
2.The Weekly Mechanical Synchronization (Every 40 Hours)
- Check the tension of all main drive tracks and adjust tracking alignment to prevent lateral panel drift.
- Inspect the scraper blades for adhesive accumulation and check the cutting edges of the fine-trimming knives.
- Clean and re-grease the primary linear guide carriages using a high-performance lithium-complex grease.
The Monthly Deep Calibration (Every 160 Hours)
- Perform a comprehensive flush of the primary adhesive pot using a dedicated cleaning compound, as detailed in our guide on how to clean glue pots on automatic edge banding machines.
- Measure the heating element resistance to identify failing thermal zones before they cause localized adhesive charring.
- Check the absolute squareness and cutting depth tolerances of the pre-milling aggregate using digital dial indicators.
For standardized protocols regarding mechanical lubrication intervals and industrial workplace safety compliance, managers should consult the Occupational Safety and Health Administration (OSHA) Machine Guarding and Maintenance Guidelines, which dictate safe locking procedures during heavy machinery servicing.
Troubleshooting Uneven Glue Application on Edge Banders
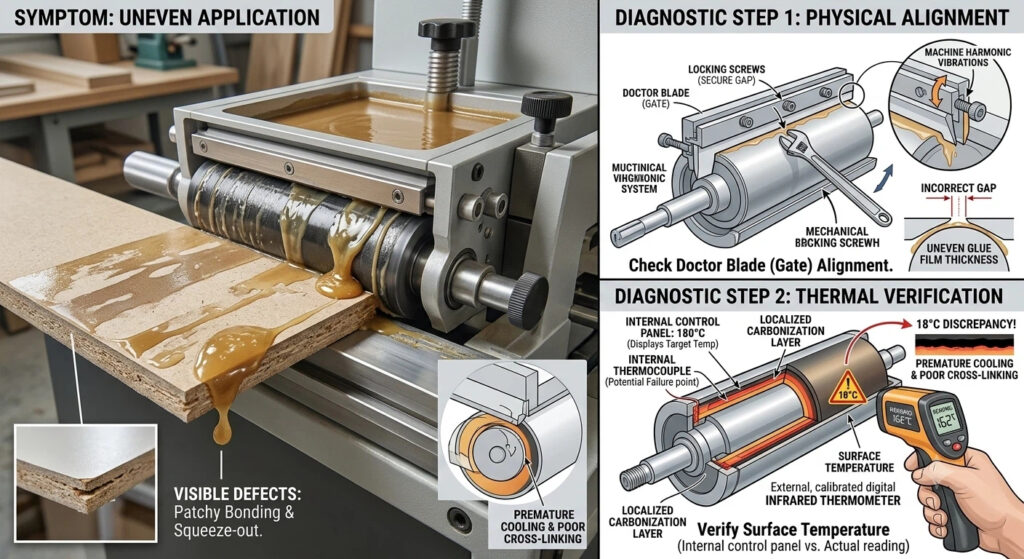
When panel edge defects begin to emerge, operators often make the critical mistake of randomly adjusting mechanical parameters without conducting a structured diagnostic evaluation. Uneven adhesive coating, patchy bonding, or heavy squeeze-out are almost always structural symptoms of an underlying thermal or volumetric imbalance within the machine’s application aggregate.
First, check the physical alignment of the doctor blade (gate). Over time, the locking screws securing the gate can shift due to machine harmonic vibrations, causing the adhesive film on the application roller to vary in thickness.
Second, verify the actual surface temperature of the glue roller using an external, calibrated digital infrared thermometer. Frequently, internal control panels display the correct target temperature, but localized carbonization or a failing thermocouple creates a significant discrepancy at the actual point of contact, leading to premature cooling and poor cross-linking.
Safeguarding Production Yields with Proactive Edge Bander Maintenance
Transitioning your manufacturing environment from a state of chaotic, reactive repair to a structured, preventative paradigm is the single most effective way to eliminate unexpected overhead and guarantee flawless product quality. As explored throughout this technical guide, the structural integrity of your finished panels depends directly on the continuous cleanliness and calibration of your processing aggregates. By implementing our rigorous 5-step cleaning protocol, enforcing a mandatory inspection frequency, and investing in advanced, self-defending machinery architectures, your facility can completely bypass the severe financial drains caused by glue pot blockages and uncoordinated trimming units.
Ultimately, long-term operational success is a direct reflection of your shop floor disciplines. While implementing a comprehensive edge bander maintenance strategy requires an initial investment of daily operational time, the return on investment is immediately realized in the total elimination of component replacement costs, minimal material scrap rates, and an optimized, uninterrupted production output that safeguards your workshop’s net profit margins.
FAQ
Can I use wire brushes or steel wool to clean carbonized deposits out of the glue pot?
No. Steel wire brushes will deeply scratch the aluminum body and destroy any protective Teflon coatings. This creates microscopic anchor points that accelerate future adhesive burning and charring. Always use soft brass scrapers, heavy felt pads, or wooden spatulas.
Why am I experiencing edge banding delamination despite the control panel showing the correct temperature?
This issue is typically caused by a hidden layer of carbonized insulation over the heating elements or a miscalibrated internal sensor. The adhesive may be melting in the center of the pot but reaching the application roller below its required wetting temperature. Verify the roller’s surface temperature externally.
How often should the diamond cutters on the pre-milling station be sharpened or replaced?
Under standard operation with medium-density fiberboard (MDF) or particleboard, high-quality diamond cutters should be checked for micro-chipping every 500 operating hours. They typically require professional sharpening or replacement after 2,000 to 3,000 hours, depending on material density and resin content.
Is it safe to leave EVA glue inside the pot at operating temperatures when the machine is idle for lunch breaks?
If the machine is idle for more than 15 minutes, you should always lower the temperature setting to approximately 120°C (or utilize an automated system like the DW3600’s auto-sleep mode). Leaving EVA glue at 180°C+ without continuous consumption causes rapid polymer oxidation and severe carbonization.