
Industry News
Edge Banding Problems: 5 Fixes for Peeling, Glue Lines, and Poor Bonding
Edge Banding Problems are rarely just cosmetic. When a band does not stick, lifts after cooling, shows a thick glue line, bubbles at the edge, or chips during trimming, the result is usually rework, wasted panels, slower production, and customer complaints.
This article groups Edge Banding Problems by symptom, cause, and fix.
This guide gives operators and furniture manufacturers a practical troubleshooting path. Instead of guessing, you will learn how to read the defect, check the machine settings, and fix the real cause. These Edge Banding Problems are easier to control when the workshop treats bonding, trimming, scraping, and maintenance as one connected process.
Table of Contents
Why Edge Banding Problems Usually Start Before the Strip
Many Edge Banding Problems begin before the PVC, ABS, veneer, or melamine banding strip touches the board.
The board edge may be dusty. Repeated Edge Banding Problems often come from small setup errors that only appear after the machine reaches production speed. The panel may be too cold. The glue pot may show the right setting, but the actual adhesive temperature at the roller may be lower. The pressure rollers may not close the joint properly.
Jowat’s technical article on failures in edgebanding explains that frequent causes include incorrect adhesive temperature, insufficient adhesive application, and inadequate edgeband pressing.
For fast edge bander troubleshooting, start with these questions:
- Is the board edge clean and freshly cut?
- Is the adhesive actually at the correct working temperature?
- Is the pressure roller applying enough force?
- Is the feed speed too fast for the adhesive open time?
- Is the feed speed too fast for the adhesive open time?
Edge Banding Not Sticking: Temperature, Pressure, and Dust
Poor bonding is one of the most searched Edge Banding Problems because it stops production quickly.
If the edge banding is not sticking, the first suspects are glue temperature, pressure, dust, and material temperature. Glue Guns Direct’s edgebanding troubleshooting page points to causes such as too little compression, adhesive being too cold, cold edgebanding material, and the need to check the technical data sheet for correct operating temperatures.
Fix it in this order:
1.Clean the board edge before feeding.
2.Check actual hot melt temperature, not only the display.
3.Confirm the glue type matches PVC, ABS, veneer, or laminate edging.
4.Reduce feed speed if the adhesive is cooling before compression.
5.Increase pressure roller force if the glue line remains thick.
A useful sign: if most glue stays on the banding instead of transferring into the board edge, bonding pressure or temperature is probably wrong.
Peeling or Lifting After Application: What to Check First
Some Edge Banding Problems look fine at first, then fail after cooling. The banding may lift at the corner, peel after trimming, or separate during handling.
This usually means the initial bond was weak. Common causes include low glue temperature, insufficient glue amount, low workshop temperature, poor banding storage, weak pressure, or a wavy board edge.
Surteco’s edgeband troubleshooting page lists issues such as too little pressure, cold adhesive, cold board or edgebanding, and adhesive joints not being closed. Those points match what operators often see on real machines: the joint looks acceptable for a moment, but the bond cannot survive cooling and stress.
To fix peeling:
- preheat cold panels or store materials in a warmer area;
- check whether the banding has too much “memory” and wants to curl back;
- inspect the pre-milling unit for waves or chipped board edges;
- increase pressure evenly across the full edge;
- confirm the glue layer is continuous, not broken.

Visible Glue Line or Uneven Glue Application
A visible glue line is one of the most frustrating Edge Banding Problems because the panel may be structurally acceptable but visually rejected.
Too much glue is not the only cause. A thick glue line may also come from low pressure, incorrect glue roller position, uneven board edges, poor trimming, or color mismatch between adhesive and panel.
Glue Guns Direct’s FAQ on edge banding notes that running temperature, guide plate setting, and coat weight are important for good glue coverage. It also suggests checking glue coverage by feeding tape or board through the machine depending on setup.
Practical fixes:
- reduce glue coat weight if the joint is flooded;
- adjust the glue roller so the board does not touch it incorrectly;
- check the guide plate and pressure roller alignment;
- use a better color match for visible surfaces;
- inspect trimming and scraping because finishing can make a glue line look worse.
Do not chase a “zero glue line” look on an unstable setup. First make the bond consistent, then improve appearance.
Bubbles, Gaps, and Open Joints
Bubbles and open joints are Edge Banding Problems that usually point to an incomplete adhesive layer or poor compression.
The defect may appear as tiny gaps, hollow-looking sections, or bubbles near the edge. The cause can be rough board edges, contamination, wrong feed speed, unsuitable adhesive, unstable banding tension, or pressure rollers that do not close the joint.
A quick test helps: cut a failed sample open and inspect the glue pattern. If the adhesive is patchy, the issue is glue application. If the glue is present but the band is loose, the issue may be pressure, temperature, or material compatibility.
For furniture factories, record settings for each panel type. MDF, particleboard, plywood, PVC edging, ABS edging, and veneer edging may all need different settings.
Trimming, Scraping, and Corner Finishing Defects
Not all Edge Banding Problems come from gluing. Sometimes the band sticks well, but the finish looks poor.
Common finishing defects include scraping marks, corner chipping, uneven trimming, white stress lines on PVC, and rough top or bottom edges.
The causes are usually mechanical:
- dull trimming cutters;
- wrong cutter height;
- scraper pressure too high;
- buffing wheel contamination;
- tracking unit misalignment;
- feed speed mismatch;
- glue residue on guide surfaces.
Before changing glue, inspect the finishing units. A sharp cutter and clean scraper can solve defects that look like bonding problems.
A Practical Edge Bander Troubleshooting Checklist
Use this checklist when Edge Banding Problems repeat across multiple panels.
- Check board edge quality after pre-milling.
- Clean dust before gluing.
- Confirm adhesive type and working temperature.
- Verify glue pot and glue roller cleanliness.
- Inspect pressure roller contact and force.
- Check feed speed against adhesive open time.
- Inspect banding storage temperature and moisture exposure.
- Review trimming, scraping, and buffing tools.
- Record machine settings for each material.
- Test on scrap panels before full production.
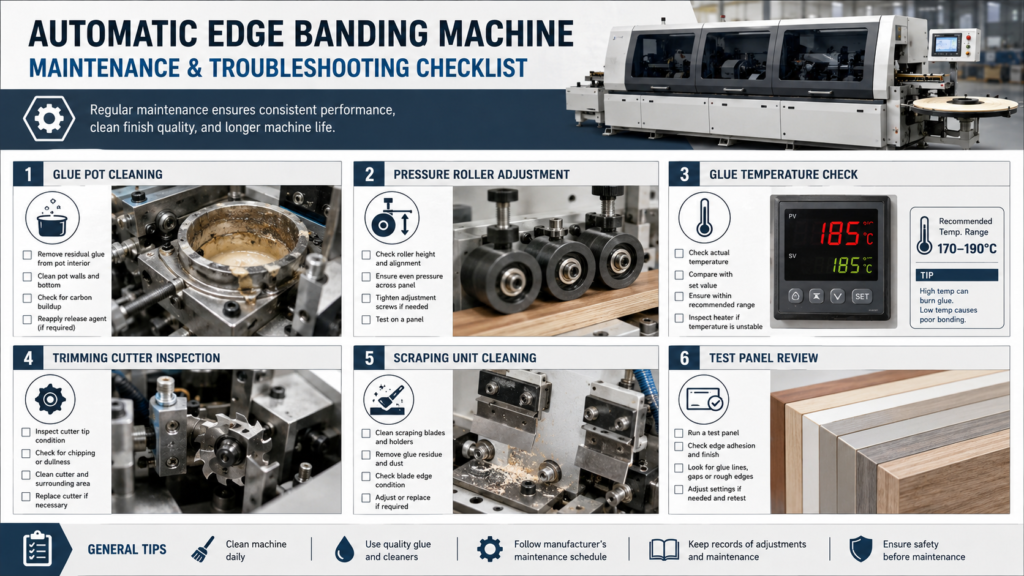
How to Prevent Edge Banding Problems Before Production Starts
The best time to solve Edge Banding Problems is before the first batch begins.
Run a short test panel every time you change panel material, edge banding thickness, adhesive type, or workshop condition. Check the first piece for bond strength, glue line, trimming quality, scraping marks, and corner finish.
The Woodworking Network article on the future of edgebanding discusses the industry demand for clean, modern designs and zero glue line results. That trend makes troubleshooting more important because customers notice glue lines, lifting edges, and finishing defects faster than ever.
Prevention habits include:
- keeping panels and banding at stable room temperature;
- cleaning glue pot and rollers daily;
- checking actual adhesive temperature;
- replacing dull cutters before defects appear;
- storing edge banding properly;
- documenting successful settings.
When the Problem Is the Machine, Not the Operator
Some Edge Banding Problems continue even after operators adjust temperature, pressure, and feed speed.
At that point, inspect the machine itself. Old pressure rollers, unstable heating, worn glue rollers, poor panel feeding, vibration in trimming units, or inaccurate tracking systems can create repeated defects.
If the same issue appears across different materials and adhesives, the machine may need maintenance, calibration, or parts replacement. For automatic edge banding machine troubleshooting, do not blame the operator before checking mechanical wear.
A stable edge banding machine should deliver repeatable glue application, controlled pressure, accurate trimming, and clean scraping. If it cannot hold those settings, production quality will remain unpredictable.
Conclusion
Edge Banding Problems should be solved by reading the defect, not by random adjustment.
f the band does not stick, start with temperature, pressure, dust, and glue coverage. If it peels later, inspect cooling, material storage, and bond strength. If the surface looks poor, check trimming, scraping, and finishing units before blaming the adhesive.
A good troubleshooting habit saves panels, reduces downtime, and keeps furniture production more predictable. If Edge Banding Problems continue after basic checks, it may be time to inspect machine calibration, worn parts, or whether the edge banding machine is suitable for your production workload.
FAQ
Why is my edge banding not sticking?
Usually because of low glue temperature, too little glue, weak pressure, dusty board edges, cold materials, or incorrect feed speed.
Why does edge banding peel off after application?
Peeling often means the bond was weak from the start. Check glue temperature, pressure rollers, board edge quality, material storage, and adhesive compatibility.
What temperature should edge banding glue be?
Follow the adhesive supplier’s technical data sheet. Do not rely only on machine display temperature; check whether the glue is stable at the application point.
Why is there a visible glue line on edge banding?
A visible glue line can come from too much glue, poor pressure, board edge defects, wrong glue roller setting, or color mismatch.
How do you fix bubbles in edge banding?
Check board edge quality, glue coverage, pressure, feed speed, and material contamination. Bubbles usually mean the adhesive layer is not continuous or not compressed properly.
How often should an edge banding machine be cleaned?
Clean glue residue, dust, rollers, and guide surfaces daily. Maintain glue pots, glue rollers, cutters, scrapers, and buffing units according to production intensity.