
Industry News
Edge Banding Not Sticking? Fix the Real Cause Before Rework Starts
Edge banding not sticking is one of the fastest ways to slow down a woodworking production line. A panel may look fine when it leaves the edge banding machine, but after cooling, trimming, or handling, the band starts lifting, peeling, or separating from the board.
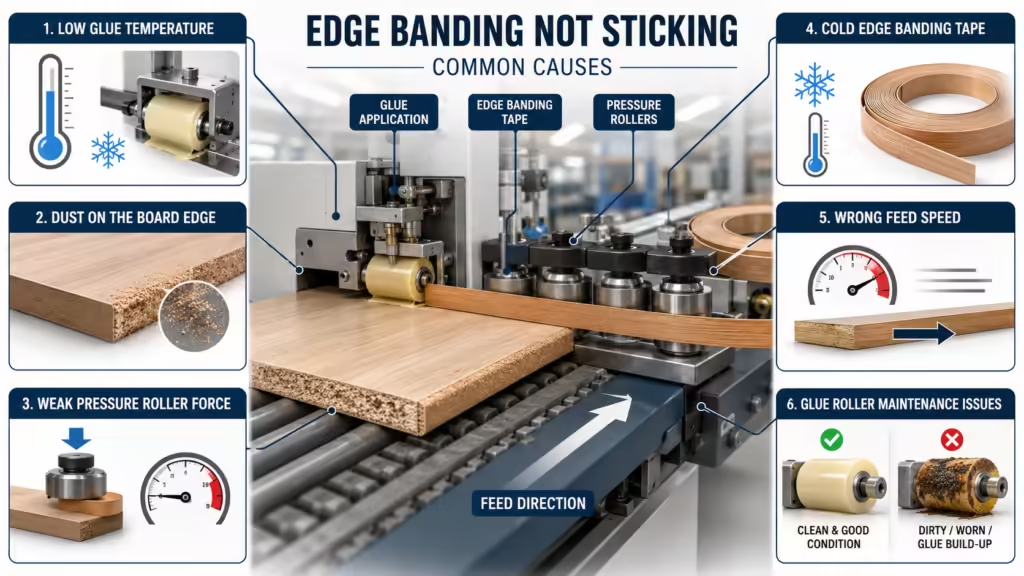
The problem is rarely caused by one factor only. Glue temperature, board edge quality, pressure roller force, feed speed, edge banding material, workshop temperature, and machine maintenance all work together. This guide explains how to find the real cause, fix it step by step, and prevent the same problem from repeating in production.
Table of Contents
Why Edge Banding Adhesion Fails in Real Production
When edge banding not sticking happens, many operators immediately blame the glue. Glue matters, but it is only one part of the bonding system.
A strong edge bond needs four conditions: enough heat, enough adhesive, enough pressure, and a clean contact surface. If one of those fails, the bond may look weak immediately or peel off after cooling.

Jowat’s technical article on failures in edgebanding lists incorrect adhesive temperature, insufficient adhesive application, and inadequate edgeband pressing among the most frequent causes of edgebanding failure.
That is why the right troubleshooting process should not be random. Start by asking:
- Is the adhesive hot enough at the application point?
- Is the board edge clean and flat?
- Is the pressure roller closing the joint properly?
- Is the feed speed suitable for the glue open time?
- Is the edge banding material compatible with the adhesive?
Low Glue Temperature: The First Thing to Check
Low glue temperature is one of the most common edge banding glue problems.
Hot melt adhesive must be fluid enough to wet the board edge and the back of the edge banding strip. If the glue is too cold, it may sit on the surface instead of forming a strong bond.
Do not only trust the temperature shown on the control panel. The displayed temperature may not always match the actual glue temperature at the roller or application point.
Cold workshops can also create problems. If the panel or edge banding tape is stored in a cold area, the glue can cool too quickly before pressure is fully applied. Woodworking Network’s edgebanding troubleshooting tips note that cold board or edgebanding material and adhesive type should be checked when the edgebanding pulls off easily.
Practical fixes:
- Check the adhesive supplier’s technical data sheet.
- Confirm actual glue temperature at the application point.
- Keep boards and edge banding materials at stable room temperature.
- Avoid cold drafts near the gluing and pressure zone.
- Test with scrap panels before full production.
Dust, Moisture, and Poor Board Edge Preparation
Dust is a major reason for edge banding adhesion failure. If fine particles remain on the board edge, the glue bonds to dust instead of the substrate.
This is especially common after cutting, sanding, or poor pre-milling. MDF, particleboard, plywood, and laminated boards can all carry dust or loose fibers along the edge.
OSHA’s wood dust overview explains that wood particles from processes such as sanding and cutting can become airborne and create health hazards in woodworking environments. For edge banding quality, the same dust also affects bonding consistency.
Moisture is another issue. If the board edge is damp or the panel has been stored in a humid area, the glue may not form a stable bond. High moisture can also create later peeling after the panel cools or moves into a different environment.
Fix it by checking:
- dust extraction near cutting and pre-milling units;
- board edge smoothness after trimming or milling;
- panel storage conditions;
- visible loose fibers or chips;
- edge dryness before gluing.
A clean, flat, dry edge gives the adhesive a better chance to work.
Weak Pressure Roller Force or Poor Contact
Edge banding not sticking after pressing often points to a pressure problem.
Hot melt glue does not create a strong joint by heat alone. The edge banding strip must be pressed firmly against the board edge while the adhesive is still active. If pressure is too weak, uneven, or delayed, the joint may remain open.
Signs of weak pressure include:
- visible gaps along the glue line;
- banding that peels off by hand;
- glue staying mostly on one side;
- uneven bonding along the panel length;
- lifting near corners or ends.
Check the pressure rollers for wear, contamination, wrong angle, or poor alignment. If glue is present but the band still lifts, pressure may be the real issue.
Also check whether the panel edge is concave, wavy, or chipped. A pressure roller cannot fully close a joint if the board edge itself is not straight.
Feed Speed Problems: Too Fast, Too Slow, or Unstable
Feed speed affects glue open time.
If the feed speed is too fast, the edge banding may not receive enough stable pressure before the adhesive begins to cool. If the feed speed is too slow, the adhesive may lose its best bonding window before the pressure rollers close the joint.
The right speed depends on glue type, workshop temperature, panel material, edge banding thickness, and machine setup.
If edge banding peeling after cooling appears only in certain sections, check whether the feed speed is unstable. A slipping conveyor, dirty pressure roller, or inconsistent panel feeding can create partial bonding failure.
A useful rule: do not change temperature, pressure, and speed all at once. Change one variable, test a sample, then record the result.
Why Is My Edge Banding Peeling Off After Application?
This is one of the most important long-tail questions: why is my edge banding peeling off after application?
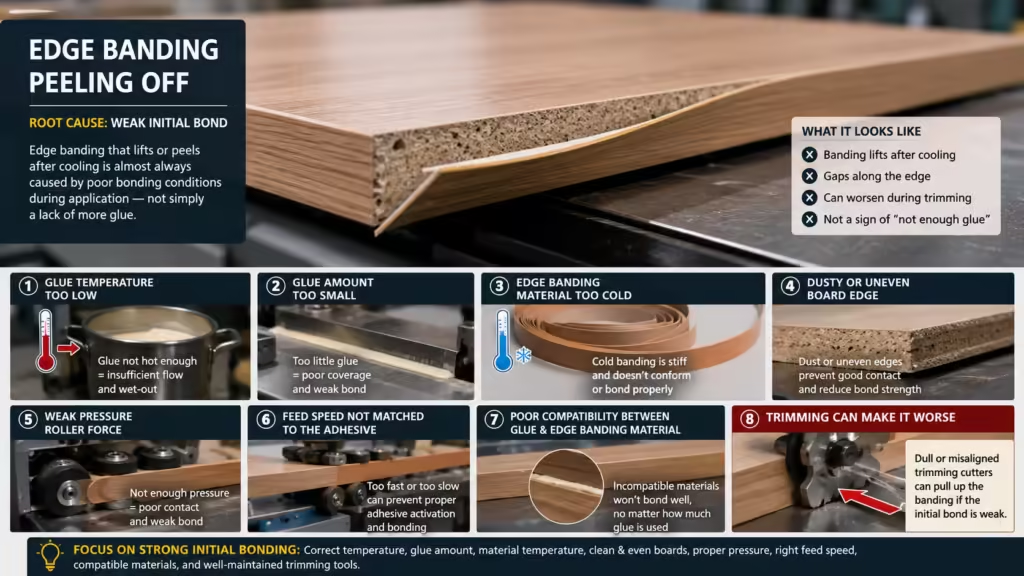
If the banding looks acceptable at first but lifts later, the initial bond was probably weak. Cooling, trimming pressure, panel handling, or internal material tension can expose the problem.
Common causes include:
- glue temperature too low;
- glue amount too small;
- edge banding material too cold;
- board edge dusty or uneven;
- pressure roller force too weak;
- feed speed not matched to adhesive;
- poor compatibility between glue and edge banding material.
If peeling happens after trimming, also inspect the trimming cutters. A dull cutter or wrong tool position can pull the banding away from the panel edge.
The fix is not simply “add more glue.” Too much glue can create a thick glue line and still fail if pressure, temperature, or surface preparation is wrong.
Wrong Edge Banding Material or Glue Compatibility
PVC, ABS, veneer, melamine, and wood edge banding do not always behave the same way. Some materials need different adhesive types, different temperatures, or better pre-treatment.
If PVC edge banding is not sticking, check whether the back side of the tape is suitable for the adhesive. If veneer edge banding keeps lifting, check moisture, surface flatness, and pressure. If ABS edge banding glue problems appear, verify glue compatibility and application temperature.
Material storage matters too. Edge banding tape can become too cold, too stiff, or too curled. Strong material memory can pull the band away from the board before the bond fully stabilizes.
For production consistency, keep different edge banding materials labeled, stored properly, and tested before large batches.
Glue Pot, Glue Roller, and Machine Maintenance Problems
If the same edge banding glue problems happen every day, maintenance may be the hidden cause.
Old adhesive can carbonize inside the glue pot. Glue rollers can become contaminated. Dust and glue residue can build up around guide surfaces, pressure rollers, scrapers, and trimming units.
A maintenance checklist should include:
- cleaning glue pot residue;
- checking glue roller surface;
- removing carbonized adhesive;
- cleaning pressure rollers;
- inspecting pre-milling quality;
- checking trimming tools;
- removing dust buildup;
- confirming stable glue flow.
How to Fix Edge Banding Not Sticking Step by Step
Use this troubleshooting sequence before changing materials or blaming the machine.
1.Check glue temperature:Confirm both set temperature and actual adhesive behavior at the roller.
2.Clean the board edge:Remove dust, loose fibers, chips, and moisture.
3.Check board and tape temperature:Cold materials can cool the adhesive too quickly.
4.Adjust pressure rollers:Make sure the banding is pressed evenly across the full edge.
5.Review feed speed:Match speed with adhesive open time and workshop conditions.
6.Check glue amount:Look for continuous glue coverage, not excessive glue.
7.Inspect material compatibility:Make sure the adhesive works with PVC, ABS, veneer, or melamine edge banding.
8.Clean the glue system:Remove old glue, carbonized residue, and roller contamination.
9.Run test panels:Do not restart mass production until the sample holds after cooling and trimming.
How to Prevent Edge Banding from Lifting in Production
Prevention is easier than rework.
For daily production, create a simple parameter record for each material combination. Record glue temperature, feed speed, pressure roller setting, board type, edge banding type, and workshop condition.
Before full production:
- run a test panel;
- check bonding after cooling;
- inspect trimming quality;
- pull test the edge manually;
- review glue line appearance;
- confirm no lifting at corners.
The UK Health and Safety Executive’s wood dust guidance notes that wood dust can cause serious health problems and must be controlled in woodworking environments. Good dust control supports both worker safety and cleaner bonding conditions.
When the Edge Banding Machine May Be the Real Problem
Sometimes edge banding not sticking is not caused by glue or material. The machine may be unstable.
Look for these signs:
- glue temperature fluctuates;
- glue roller applies unevenly;
- feed speed changes during operation;
- pressure rollers do not contact evenly;
- trimming units pull the banding;
- glue pot requires frequent cleaning;
- defects repeat across different materials.
For furniture factories and panel production lines, a stable automatic edge banding machine should maintain consistent gluing, pressing, trimming, scraping, and buffing. If the machine cannot hold settings, the same defects will return even after operators adjust glue temperature and pressure.
Conclusion
Edge banding not sticking should be solved by finding the real cause, not by guessing. Low glue temperature, dust, weak pressure, wrong feed speed, cold materials, poor glue compatibility, and machine maintenance issues can all create the same visible problem.
The best approach is to troubleshoot in order: heat, surface, pressure, speed, material, and machine condition. When this process becomes part of daily production, factories can reduce peeling, lifting, rework, and waste.
If edge banding adhesion problems keep slowing down your production, it may be time to review your glue system, pressure setup, and machine configuration. A stable automatic edge banding machine can help improve bonding consistency, reduce rework, and keep panel production more predictable.
FAQ
Why is my edge banding not sticking?
Usually because of low glue temperature, dusty board edges, weak pressure, wrong feed speed, insufficient glue, cold materials, or glue compatibility problems.
What temperature should edge banding glue be?
Follow the adhesive supplier’s technical data sheet. Do not rely only on the machine setting; check whether the glue is stable at the application point.
Why does edge banding peel off after cooling?
Peeling after cooling usually means the initial bond was weak. Check glue temperature, pressure, board edge quality, material temperature, and feed speed.
Can dust cause edge banding adhesion failure?
Yes. Dust prevents direct contact between glue and board edge, which can cause weak bonding, lifting, or peeling.
How do you fix edge banding that keeps peeling?
Check glue temperature, clean the board edge, adjust pressure rollers, verify feed speed, inspect glue amount, and test material compatibility.
Does feed speed affect edge banding adhesion?
Yes. Feed speed affects how long the adhesive remains workable before pressure is applied and before the glue cools.